Follow this step-by-step guide to configure your Primcast Auto DJ Cloud account for continuous automated streaming. Upload your tracks, build playlists, and go live without a computer.
Follow each step carefully to configure your Auto DJ Cloud account and start automated streaming to your Primcast radio server.
Open a browser and go to cast2.primcast.com. Enter your username and password to log in. You will need to complete some basic account settings before Auto DJ can be used.
 Expand
Once logged in, click Files in the left column of the panel to start uploading your audio files. Please note that the server only supports the .mp3 file format.
 Expand
Double-click the media directory (folder), then click the Upload button at the bottom of the screen to begin adding your MP3 files.
 Expand
A File Manager window will appear. Use this interface to select and upload your music files to the account.
 Expand
After selecting all the files you want and the Overall progress bar is full, close the File Manager window and click the Return button to go back to the main panel.
 Expand
Back on the main control panel, click Media in the left column to start adding your uploaded music files to a playlist.
 Expand
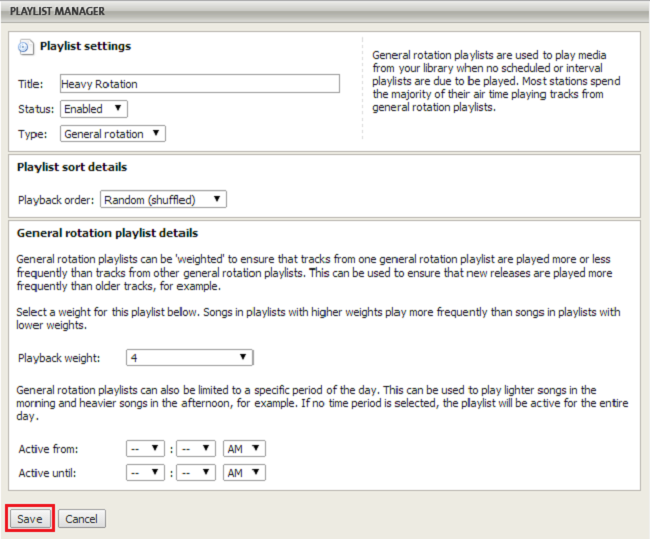
Once you have finished adding songs to the desired playlist, click Return to go back to the main panel. Then go to Playlists in the left column, enable your configured playlist, and disable any other playlists that are enabled but not in use.
 Expand
To change the playlist name or other details, click Edit playlist. Make your changes and save before continuing.
 Expand
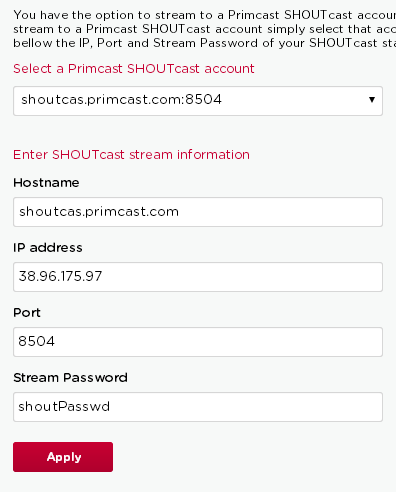
After finishing your playlist configuration, you can start the server from the left panel. If the Auto DJ account is not yet linked to your SHOUTcast server, log in to your primcast.com account, select the Auto DJ account from the dropdown on the left, click Update, and then click Settings.
 Expand
If you have a SHOUTcast account with Primcast, your server details will appear in the list automatically. If not, enter your own station details manually and click Apply.
 Expand
Once the SHOUTcast server details are saved, click Mainboard in the left panel and activate the Auto DJ to begin streaming.
 Expand
Your server is now streaming your tracks directly from the Primcast Auto DJ server. Your radio station is live and broadcasting automatically.
Common questions about setting up and using Primcast Auto DJ Cloud for automated streaming.